MySQL - Introduction
MySQL is the most popular open-source database system. It is free program that competes with a Microsoft product named SQL.
MySQL is the database used by the McFarland School District for its web site. It is used for sites that are small and sites that are large, including Google.
What is MySQL?
MySQL is a database.
The data in MySQL is stored in database objects called tables.
A table is a collections of related data entries and it consists of columns and rows.
Databases are useful when storing information categorically. A company may have a database with the following tables: "Employees", "Products", "Customers" and "Orders".
Database Tables
A database most often contains one or more tables. Each table is identified by a name (e.g. "Customers" or "Orders"). Tables contain records (rows) with data.
Below is an example of a table called "students":
| student_id |
last_name |
first_name |
graduation |
| 482114 |
Hendrix |
Jimi |
2014 |
| 658411 |
Temple |
Shirley |
2011 |
| 658412 |
Johnson |
Bob |
2012 |
The table above contains three records (one for each person) and four columns (last_name, first_name, graduation, and student_id). The column titles are sometimes called fields.
Queries
A query is a question or a request.
With MySQL, we can query a database for specific information and have a recordset returned.
Look at the following query:
SELECT last_name FROM students
The query above selects all the data in the "last_name" column from the "students" table, and will return a recordset like this:
| last_name |
| Hendrix |
| Temple |
| Johnson |
MySQL - Connecting to a Database
Before you can add databases, create tables or perform any other database activity you need to be able to connect to MySQL. In order for that to happen MySQL has to be installed on the web server that holds your site. In general MySQL is an installed feature offered by commercial web hosts such as GoDaddy, 1and1, and many others.
Because MySQL is installed on our hs-web-class server we can use it to learn how to work with databases
Connecting to MySQL requires a user name and password. There has been an account created for each student in this class that will be used to connect to MySQL. You will use your regular school user name (using all lowercase letters) and password that you use to log in to the computer. The MySQL user privileges have been set to a level that will allow you to complete the exercises in this tutorial.
- In this first exercise you will create a web page that connects you to MySQL. In Dreamweaver create a new PHP page named db_connect.php. Remove all of the existing HTML code and then add the follow code.
<?php

	ini_set('display_errors', 1);

	$con = mysql_connect("localhost","USER NAME GOES HERE","USER PASSWORD GOES HERE");

	if (!$con)

	die('Could not connect: ' . mysql_error());

	else

	echo 'Connected';

	mysql_close($con);

	?>
- Create a folder named mysql_tutorial on the web server. FTP db_connect.php to the new folder on the web server. Preview db_connect.php In a browser. (http://hs-web-class/web_students/your_folder/mysql_tutorial/db_connect.php) You should see a message that shows a successful connection was made.
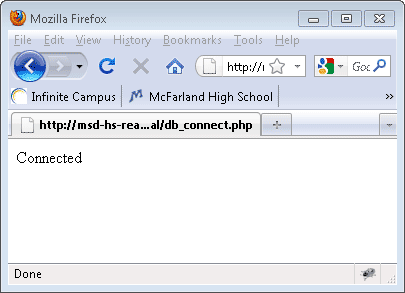
- Let's look at the code in more detail.
ini_set('display_errors', 1);
- This code lets the computer display any errors that may occur.
$con = mysql_connect("localhost","USER NAME GOES HERE","USER PASSWORD GOES HERE");
- This code attempts to connect to MySQL using the supplied server name, user name and password
- If the connection is made the variable $con is set to true, otherwise it is set to false
if (!$con)

		die('Could not connect: ' . mysql_error());

		else

		echo 'Connected';
- This code displays either a message of success or failure to make a connection on the web page
mysql_close($con);
- This code closes the connection to MySQL.
MySQL - Create a Database
In this exercise you will be creating a database. Once a database has been created tables that will hold data can be added to the database.
The CREATE DATABASE statement is used to create a database in MySQL.
(NOTE: Creating a database will not actually work because there already exists a database with your user name. It was created by the teacher when setting up your user account for this class. The code below would actually create a database if it had not already been done.)
- In Dreamweaver create a new PHP page named db_create.php. Remove all of the existing HTML code and then add the follow code. After pasting don't forget to change your_school_user_name (2 places) and your_school_password to your school name and password.
<?php

	ini_set('display_errors', 1);

	$con = mysql_connect("localhost","your_school_user_name","your_school_password");

	if (!$con){die('Could not connect: ' . mysql_error());}

	if (mysql_query("CREATE DATABASE your_school_user_name",$con))

	{

	echo "Database created";

	}

	else

	{

	echo "Error creating database: " . mysql_error();

	}

	mysql_close($con);

	?>
- FTP db_create.php to the web server. Preview db_create.php In a browser. (http://hs-web-class/web_students/your_folder/mysql_tutorial/db_create.php) You should see a message that shows a database was successfully created.
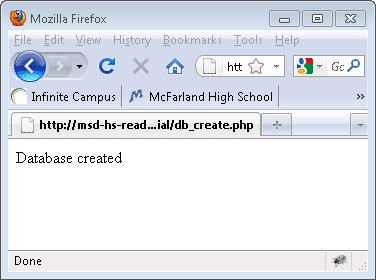
- Let's look at the code in more detail.
ini_set('display_errors', 1);
- This code lets the computer display any errors that may occur.
$con=mysql_connect("localhost","school_user_name","your_school_password");
- This code attempts to connect to MySQL using the supplied server name, user name and password
- If the connection is made the variable $con is set to true, otherwise it is set to false
if (!$con){die('Could not connect: ' . mysql_error());}
- This code displays an error message if there is a failure to make a connection
if (mysql_query("CREATE DATABASE school_user_name",$con))

		{

		echo "Database created";

		}

		else

		{

		echo "Error creating database: " . mysql_error();

		}
- This code attempts to create a database named your_school_user_name using the $con to connect to MySQL.
- If successful the Database created text will appear on the page
- If there is a failure then a message detailing the failure will be displayed on the page.
mysql_close($con);
- This code closes the connection to MySQL.
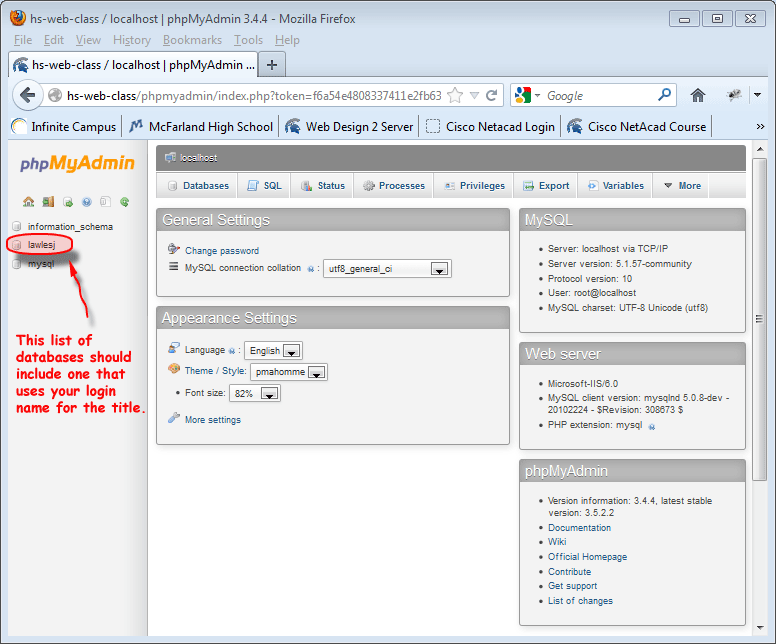
- So how can you be sure that the code really did create a database? One way to do that would be to access a program on the server called phpMyAdmin. This free to download program was written to make working with mySQL easier. In class you will be using php to create databases and the tables in the databases. You will be using php to add and delete data from tables. You will not be using phpMyAdmin to do this work for you. However, you are allowed to use phpMyAdmin to verify that your php code is working correctly. To access phpMyAdmin on the web server follow these steps:
- After logging in you should see a screen similar to that shown below. The column on the left displays a list of the databases that exist in your account. Two databases, information_schema and mysql, are there by default and should not be changed. There should also be another database that uses your login name for its title.
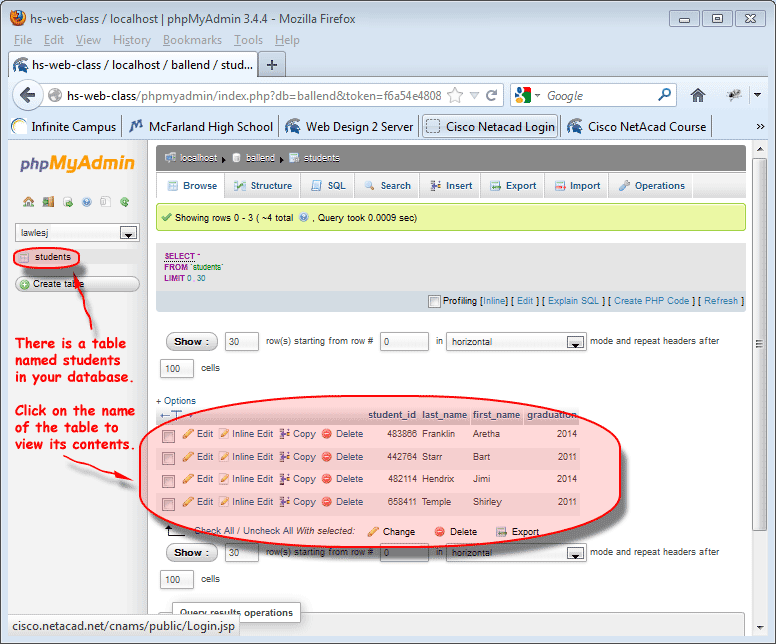
- Click the mouse on the name of your database to view a list of the tables. (NOTE: At this point in the tutorial you do not have any tables but this is how you will view them later in the tutorial.)
MySQL Tutorial - Creating a Table
In this exercise you will add a table to the database you created previously. The CREATE TABLE statement is used to create a table in MySQL.
Syntax:
CREATE TABLE table_name

(

column_name1 data_type,

column_name2 data_type,

column_name3 data_type,

....

)
- In Dreamweaver create a new PHP page named db_table.php. Remove all of the existing HTML code and then add the follow code.
<?php

	ini_set('display_errors', 1);

	$con = mysql_connect("localhost","your_school_login_name","your_school_password");

	if (!$con){die('Could not connect: ' . mysql_error());}


	mysql_select_db("ENTER YOUR DATA BASE NAME HERE - which should be your login name", $con); //select the database that will get a table

	// create the table

	$sql = "CREATE TABLE students

	(

	student_id int(6),

	last_name varchar(15),

	first_name varchar(15),

	graduation int(6)

	)";

	mysql_query($sql,$con);// execute the query

	mysql_close($con);// close the connection

	?>
- FTP db_table.php to the web server. Preview the page in a browser. Although it may seem that nothing happened there actually was a table created in the database you created earlier.
- Let's look at the new code in more detail:
mysql_select_db("ENTER YOUR DATABSE NAME HERE", $con);
- This code selects which database will receive the new table
$sql = "CREATE TABLE students

		(

		student_id int(6),

		last_name varchar(15),

		first_name varchar(15),

		graduation int(6)

		)";
- This code gives the names of the columns (fields) in the table. For example student_id is a field name.
- This code defines what type of data will be placed in each column. For example, varchar is a type of data that can be text or numbers
- This code defines a limit to how many characters of data can be held in the field. For example varchar(15) limits the size of the data entered to 15 characters.
mysql_query($sql,$con);
- This code is where the execution of the previous code is made. This is when the table is created.
MySQL Tutorial - Inserting Data into a Table
In this exercise you will be inserting data into the table created previously. The INSERT INTO statement is used to insert new records in a table.
- In Dreamweaver create a new PHP file named db_insert.php. Delete all of the existing HTML and replace it with the following code:
<?php

	ini_set('display_errors', 1);

	$con = mysql_connect("localhost","your_school_login","your_school_password");

	if (!$con){die('Could not connect: ' . mysql_error());}

	mysql_select_db("ENTER YOUR DATA BASE NAME HERE", $con); //select the database that will get a table

	mysql_query("INSERT INTO students (student_id, last_name, first_name, graduation) VALUES ('482114','Hendrix', 'Jimi', '2014')");

	mysql_query("INSERT INTO students (student_id, last_name, first_name, graduation) VALUES ('658411','Temple', 'Shirley', '2011')");

	mysql_close($con);// close the connection

	?>
- FTP db_insert.php to the web server. Preview db_insert.php in a browser. Although you will not be able to see anything on the web page the data was inserted into the table. The data in this sample is two records about the students Jimi and Shirley.
- Let's view the new code in more detail:
mysql_query("INSERT INTO students (student_id, last_name, first_name, graduation) VALUES ('482114','Hendrix', 'Jimi', '2014')");
- Notice that the order of the field names is the same as the order in the table and the data inserted
- Notice that the field names are separated by commas as is the data
- Notice that there are double quotes around the entire query
MySQL Tutorial - Select Data in a Table
In this exercise you will read data in an existing table and display it on a web page.
Reading only from selected columns:
- In Dreamweaver create a new PHP page named db_select.php. Delete the existing HTML code and replace it with the following:
<?php

	ini_set('display_errors', 1);

	$con = mysql_connect("localhost","your_school_login","your_school_password");

	if (!$con){die('Could not connect: ' . mysql_error());}

	mysql_select_db("ENTER YOUR DATA BASE NAME HERE", $con);

	$result = mysql_query("SELECT last_name, first_name FROM students");

	mysql_close($con);

	?>

	<!DOCTYPE html PUBLIC "-//W3C//DTD XHTML 1.0 Strict//EN" "http://www.w3.org/TR/xhtml1/DTD/xhtml1-strict.dtd">

	<html xmlns="http://www.w3.org/1999/xhtml">

	<head>

	<meta http-equiv="Content-Type" content="text/html; charset=utf-8" />

	<title>MySQL Tutorial - Select</title>

	</head>

	<body>

	<?php

	while($row = mysql_fetch_array($result))

	{

	echo $row['last_name'].', '.$row['first_name'];

	echo "<br />";

	}

	?>

	</body>

	</html>
- FTP db_select.php to the web server. Preview db_select.php in a browser. Finally you can confirm that the work done previously in this tutorial has been successful!
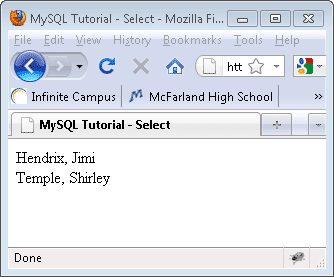
- Let's take a look at the new code in more detail:
$result = mysql_query("SELECT last_name, first_name FROM students");
- This code is a query that retrieves all data from the first_name and last_name fields.
- The data selected is placed in an array with the variable name $result
while($row = mysql_fetch_array($result))
- This code is a while loop that reads through the array $result until there are no more rows of records
- Each piece of data is represented by $row['field name']
echo $row['last_name'].', '.$row['first_name'];
- This code echos the data found in the current row's fields with a comma separating them
Reading from all columns:
- In Dreamweaver duplicate db_select.php (right-click on db_select.php and choose Edit, Duplicate) and rename the new file db_select_all.php. Change the following line of code from:
$result = mysql_query("SELECT last_name, first_name FROM students"); to read:
$result = mysql_query("SELECT * FROM students");
- In db_select_all.php change the following code from:
<?php

	while($row = mysql_fetch_array($result))

	{

	echo $row['last_name'].', '.$row['first_name'];

	echo "<br />";

	}

	?>
to read:
<?php

	echo '<table border="1" cellpadding="2">';

	echo '<tr><td colspan="4" align="center">Students</td></tr>';

	while($row = mysql_fetch_array($result))

	{

	echo '<tr>';

	echo '<td>'.$row['student_id'].'</td><td>'.$row['last_name'].'</td><td>'.$row['first_name'].'</td><td>'.$row['graduation'].'</td>';

	echo "</tr>";

	}

	echo '</table>';

	?>
- FTP db_select_all.php to the web server. Preview db_select_all.php in a browser.
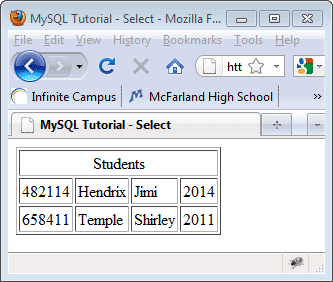
- Let's view the new code in more detail:
$result = mysql_query("SELECT * FROM students");
- Notice that the asterisk (*) is a symbol that tells the computer to select all of the data in the selected table
echo '<td>'.$row['student_id'].'</td><td>'.$row['last_name'].'</td><td>'.$row['first_name'].'</td><td>'.$row['graduation'].'</td>';
- This code places each piece of data into an HTML table cell.
- Notice that the beginning of the table occurs before the while loop begins and ends after the while loop
MySQL Tutorial - the WHERE clause
In this exercise you will first be inserting additional students into the students table created previously. After that you will learn how to select data in a table using the WHERE clause.
- In Dreamweaver open the previously created db_insert.php. Replace the existing values with these new values:
483866, Franklin, Aretha, 2012
442764, Starr, Bart, 2013
- Save the changes made to db_insert.php and FTP it to the web server. Preview db_insert.php in a browser. Although it does not appear anything happened the code inserting the new data was executed.
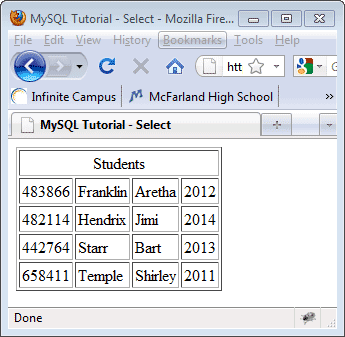
- In a browser preview the file db_select_all.php. The data from the table will be displayed as shown below.
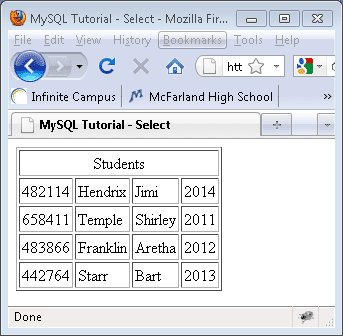
- In Dreamweaver duplicate the file db_select_all.php. Rename the new file db_select_where.php.
- Change the line of code that reads:
$result = mysql_query("SELECT * FROM students"); to $result = mysql_query("SELECT * FROM students WHERE last_name = 'Starr'");
- Save the changes and FTP db_select_where.php to the web server.
- Preview db_select_where.php in a browser.
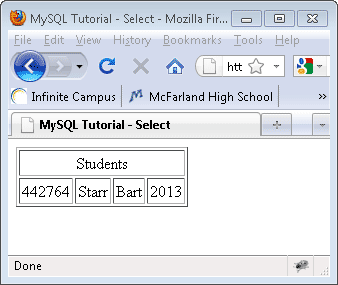
- Let's look at the new code in more detail.
$result = mysql_query("SELECT * FROM students WHERE last_name = 'Starr'");
- Notice that the WHERE clause limits the data selected. In this example the data selected must have Starr in the last_name field.
- There is a wild card symbol that can be used in database searching. MySQL uses the '%' sign for this purpose. Change the query code in db_select_where.php so that it reads as:
$result = mysql_query("SELECT * FROM students WHERE student_id LIKE '%6%'");
- Save the changes made to db_select_where.php and FTP it to the web server. Preview the changes in a browser. Notice that the records selected all have a 6 in somewhere in the student_id field.
- Take some time to experiment with the WHERE clause to see what can be selected. For example, try selecting for all students who will graduate after 2011.
MySQL Tutorial - ORDER BY keyword
In this exercise you will learn how to use the ORDER BY keyword to sort the data that is selected during a MySQL query.
The ORDER BY Keyword
- The ORDER BY keyword is used to sort the data in a recordset.
- The ORDER BY keyword sort the records in ascending order by default.
- If you want to sort the records in a descending order, you can use the DESC keyword.
Syntax:
SELECT column_name(s)

FROM table_name

ORDER BY column_name(s) ASC|DESC
- In Dreamweaver duplicate db_select_where.php and rename it db_select_order_by.php.
- Change the following query code: (it may be different if you experimented with the query during the last exercise)
$result = mysql_query("SELECT * FROM students WHERE last_name = 'Starr'"); to
$result = mysql_query("SELECT * FROM students ORDER BY last_name");
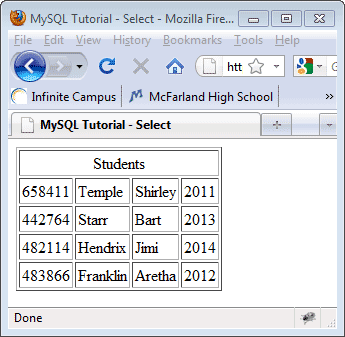
- Save the changes to db_select_order_by.php and FTP it to the web server. Preview db_select_order_by.php in a browser. Confirm that the data has been sorted alphabetically in ascending (A-Z) order by the students' last names.
- Change the query code:
$result = mysql_query("SELECT * FROM students ORDER BY last_name"); to
$result = mysql_query("SELECT * FROM students ORDER BY last_name DESC");
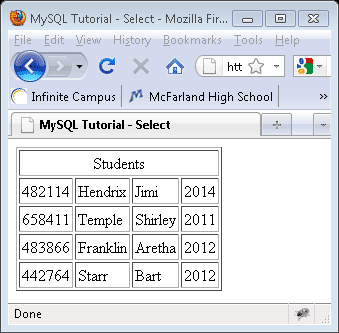
- Save the changes to db_select_order_by.php and FTP it to the web server. Preview db_select_order_by.php in a browser. Confirm that the data has been sorted alphabetically in descending (Z-A) order by the students' last names.
- Take some time to experiment with the ORDER BY keyword to sort the data in other fields. For example, try sorting by the student_id field.
MySQL Tutorial - Updating Data in a Table
The UPDATE statement is used to change data in an existing table.
Syntax:
UPDATE table_name

SET column1=value, column2=value2,...

WHERE some_column=some_value
Note: Notice the WHERE clause in the UPDATE syntax. The WHERE clause specifies which record or records that should be updated. If you omit the WHERE clause, all records will be updated!
- In Dreamweaver duplicate db_select_all.php and rename the new file db_update.php. Add the code:
mysql_query("UPDATE students SET graduation = '2012' WHERE first_name = 'Bart' AND last_name = 'Starr'"); before
$result = mysql_query("SELECT * FROM students");
- Save the changes to db_update.php and FTP it to the web server. Preview db_update.php in a browser. Notice that the graduation year for Bart Starr has been changed to 2012.
- Take some time to experiment with the UPDATE statement. For example, change the student_id of Shirley Temple.
MySQL Tutorial - Delete Statement
The DELETE statement is used to delete records in a table.
The DELETE FROM statement is used to delete records from a database table.
Syntax:
DELETE FROM table_name

WHERE some_column = some_value
Note: Notice the WHERE clause in the DELETE syntax. The WHERE clause specifies which record or records that should be deleted. If you omit the WHERE clause, all records will be deleted!
- In Dreamweaver duplicate db_update.php and rename the new file db_delete.php.
- In db_delete.php remove:
mysql_query("UPDATE students SET graduation = '2012' WHERE first_name = 'Bart' AND last_name = 'Starr'"); and replace it with:
mysql_query("DELETE FROM students WHERE last_name='Hendrix'");
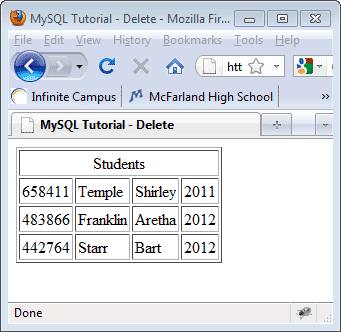
- Save the changes made to db_delete.php and FTP it to the web server. Preview the changes in a browser. Confirm that the record for Jimi Hendrix has been deleted from the table.

MySQL Tutorial - Add Column to Table
In this exercise you will learn how to add a field (column) to an existing table.
- In Dreamweaver duplicate the file named db_select_all.php. Rename the new file db_add_column.php.
- Above the line of code
$result = mysql_query("SELECT * FROM students"); add
mysql_query("ALTER TABLE students ADD id INT( 5 ) NOT NULL AUTO_INCREMENT PRIMARY KEY FIRST");
- In the <body> of db_add_column.php remove the existing PHP code and replace it with
<?php

	echo '<table border="1" cellpadding="2">';

	echo '<tr><td colspan="5" align="center">Students</td></tr>';

	echo '<td>ID</td><td>Student ID</td><td>Last Name</td><td>First Name</td><td>Graduation Year</td>';

	while($row = mysql_fetch_array($result))

	  {

	  echo '<tr>';

	  echo '<td>'.$row['id'].'</td><td>'.$row['student_id'].'</td><td>'.$row['last_name'].'</td><td>'.$row['first_name'].'</td><td>'.$row['graduation'].'</td>';

	  echo "</tr>";

	  }

	echo '</table>';

	?>
- Save the changes to db_add_column.php and FTP it to the web server. Preview the changes in a browser. Confirm that the id column was added to the table.
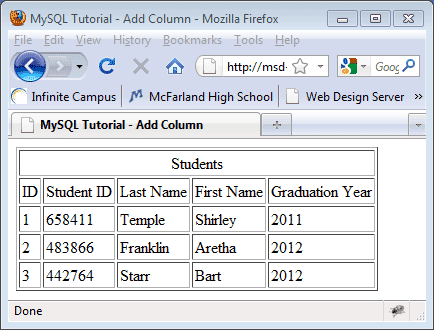
- Let's examine the new code in more detail.
mysql_query("ALTER TABLE students ADD id INT( 5 ) NOT NULL AUTO_INCREMENT PRIMARY KEY FIRST");
- ALTER TABLE is the command that tells MySQL that a table will be changed
- The ADD command is used to add a new column to a table, in this case the students table. The column to add will be named id in this example.
- INT ( 5) lets MySQL know that the id field will contain integers (whole numbers) and will be limited to a maximum of 5 characters.
- NOT NULL lets MySQL know that the id field will never be empty
- AUTO_INCREMENT lets MySQL know that every time a new record is added to the table the id field will increase by the value of 1.
- PRIMARY KEY lets MySQL know that there can be no duplicate values in the id field.
- FIRST tells MySQL that the new field should be added so that it is the first field in the table.
- The PHP code that exists in the <body> of db_add_column.php has been modified so that it will display a new row with titles for each of the columns. Also, a new table cell was added so that the id field can be displayed.
MySQL Tutorial - Add a Record Using a Form
In this exercise you create a web form that when submitted adds another record to an existing table.
- In Dreamweaver create a new PHP file. Name the file db_insert_using_form.php.
- Delete all of the code in db_insert_using_form.php and replace it with:
<?php

	ini_set('display_errors', 1);

	$con = mysql_connect("localhost","YOUR_SCHOOL_LOGIN","YOUR_SCHOOL_PASSWORD");

	if (!$con){die('Could not connect: ' . mysql_error());}

	mysql_select_db("ENTER YOUR DATA BASE NAME HERE", $con);


	if (isset($_POST['submit'])) //record is being added to students table

	{

	$stu_id=$_POST['student_id'];//put value posted in student_id text field into variable $stu_id

	$last=$_POST['lname'];//put value posted in lname text field into variable $last

	$first=$_POST['fname'];//put value posted in fname text field into variable $first

	$graduation=$_POST['grad_year'];//put value posted in grad_year text field into variable $graduation

	mysql_query("INSERT INTO students (id, student_id, last_name, first_name, graduation) VALUES (NULL,'$stu_id','$last','$first','$graduation')");

	}

	$result = mysql_query("SELECT * FROM students");

	mysql_close($con);

	?>


	<!DOCTYPE html PUBLIC "-//W3C//DTD XHTML 1.0 Strict//EN" "http://www.w3.org/TR/xhtml1/DTD/xhtml1-strict.dtd">

	<html xmlns="http://www.w3.org/1999/xhtml">

	<head>

	<meta http-equiv="Content-Type" content="text/html; charset=utf-8" />

	<title>MySQL Tutorial - Insert Record using a Form</title>

	</head>

	<body>

	<form action="db_insert_using_form.php" method="post" name="student_editor">

	<fieldset>

	<legend>Student Information</legend>

	<label>First name: <input name="fname" type="text" size="20" maxlength="18" /></label><br /><br />

	<label>Last name: <input name="lname" type="text" size="30" maxlength="28" /></label><br /><br />

	<label>Student ID: <input name="student_id" type="text" size="7" maxlength="6" /></label><br /><br />

	<label>Graduation Year: <input name="grad_year" type="text" size="5" maxlength="4" /></label><br /><br />

	</fieldset>

	<input name="submit" type="submit" value="Add Student" />

	</form>

	<hr /><hr />


	<?php

	echo '<table border="1" cellpadding="2">';

	echo '<tr><td colspan="5" align="center">Students</td></tr>';

	echo '<tr><td>ID</td><td>Student ID</td><td>Last Name</td><td>First Name</td><td>Graduation Year</td></tr>';

	while($row = mysql_fetch_array($result))

	{

	echo '<tr>';

	echo '<td>'.$row['id'].'</td><td>'.$row['student_id'].'</td><td>'.$row['last_name'].'</td><td>'.$row['first_name'].'</td><td>'.$row['graduation'].'</td>';

	echo "</tr>";

	}

	echo '</table>';

	?>

	</body>

	</html>
- Save the changes to db_insert_using_form.php and FTP it to the web server. Preview db_insert_using_form.php in a browser.
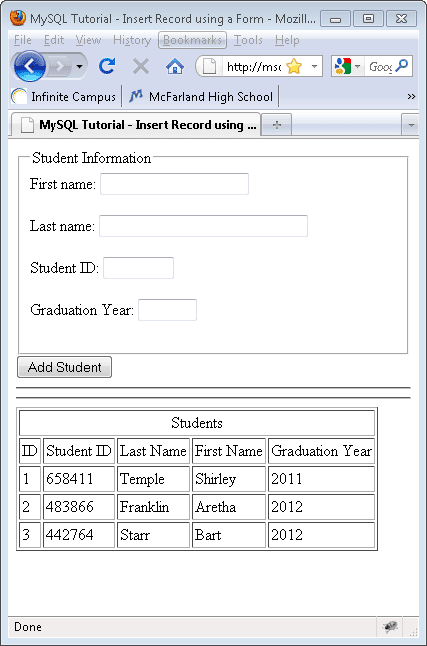
- Using the data below fill in the text fields of the web form on db_insert_using_form.php and then press the Add Student submit button.
- First name: Tom
- Last name: Thumb
- Student ID: 455768
- Graduation year: 2014
 Confirm that the record for Tom Thumb has been added to the table. Confirm that the record for Tom Thumb has been added to the table.
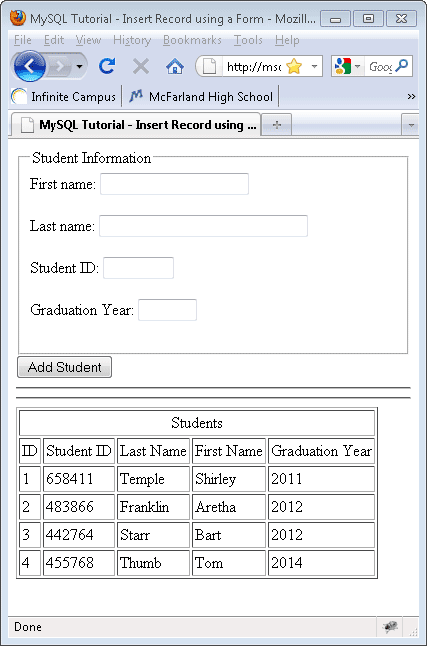
- Let's look at the new code in more detail
if (isset($_POST['submit'])
- When the page is opened this code checks to see if the submit button was pressed. If it was pressed then the code between the braces of the if statement will be executed.
- isset means that the variable has a value
$stu_id=$_POST['student_id'];
- This code places the posted value of the student_id field into the variable $stu_id
mysql_query("INSERT INTO students (id, student_id, last_name, first_name, graduation) VALUES (NULL,'$stu_id','$last','$first','$graduation')");
- You've seen the insert code previously. The difference here is that variable are being used.
- Notice the the id field is being sent a NULL value. NULL means empty. This is because the id field in the table is an auto increment table. MySQL will automatically enter this value. We cannot send it a value.
MySQL Tutorial - Edit/Delete Records
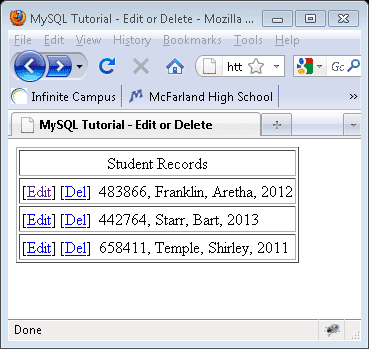
In this exercise we will be creating a web page that lists the records in the students table. There will be links that allow you to either edit an existing record or delete an existing record. When you are finished with this exercise the page will look like:
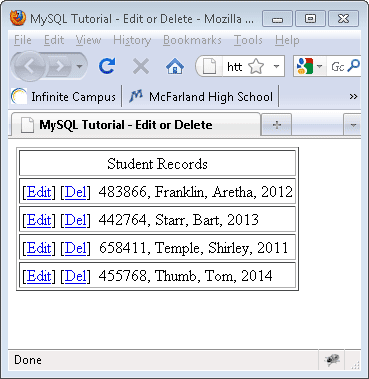
- In Dreamweaver create a new PHP file. Name the new file db_edit_or_delete.php.
- Delete all of the existing code in db_edit_or_delete.php and replace it with the following code:
<?php
ini_set('display_errors', 1);
$con = mysql_connect("localhost","web2_user","web2_pass");
if (!$con){die('Could not connect: ' . mysql_error());}
mysql_select_db("ENTER YOUR DATA BASE NAME HERE", $con);
if (isset($_GET['del']) & isset($_GET['id']))
{
$query = "DELETE FROM students WHERE id = ".$_GET['id'];

		mysql_query($query)or die("Invalid query here: " . mysql_error());
}
$result = mysql_query("SELECT * FROM students ORDER BY last_name ASC");
mysql_close($con);
?>
<!DOCTYPE html PUBLIC "-//W3C//DTD XHTML 1.0 Strict//EN" "http://www.w3.org/TR/xhtml1/DTD/xhtml1-strict.dtd">
<html xmlns="http://www.w3.org/1999/xhtml">
<head>
<meta http-equiv="Content-Type" content="text/html; charset=utf-8" />
<title>MySQL Tutorial - Edit or Delete</title>
<script type="text/javascript">
function confirmDelete(href)
{
if (confirm("You are about to permanently delete this student record. Press OK to delete the record or Cancel to stop the deletion."))
{
window.location = href;
}
}
</script>
</head>
<body>
<?php
echo '<table border="1" cellpadding="2">';
echo '<tr><td colspan="5" align="center">Student Records</td></tr>';
while($row = mysql_fetch_array($result))
{
$id = $row['id'];
$student_id = $row['student_id'];
$last_name = $row['last_name'];
$first_name = $row['first_name'];
$graduation = $row['graduation'];
echo '<tr><td colspan="5">';
echo '[<a href="db_edit_record.php?id=' . $id . '">Edit</a>] [<a href="#" onclick="confirmDelete(\'db_edit_or_delete.php?del=1&id=' . $row['id'] .'\')">Del</a>] '.$student_id.', '.$last_name.', '.$first_name.', '.$graduation;
echo "</td></tr>";
}
echo '</table>';
?>
</body>
</html>
- Let's look at the new code in more detail.
$result = mysql_query("SELECT * FROM students ORDER BY last_name ASC");
- This code selects all of the student data sorted alphabetically
echo '[<a href="db_edit_record.php?id=' . $id . '">Edit</a>]
- This code creates a link to db_edit_record.php (a page that will be made in the next exercise) for editing a record. Attached to the link is the id of the record to be edited.
[<a href="#" onclick="confirmDelete(\'db_edit_or_delete.php?del=1&id=' . $row['id'] .'\')">Del</a>]
- Because the php code for deleting a record is on this page this code creates a link to itself using a javascript onclick() method named confirmDelete(). The parameter that is passed to the confirmDelete() is the address (url) of the page that will do the deletion. Also passed in the parameter is a value 1 set in the variable named del and the id of the record to be deleted.
if (isset($_GET['del']) & isset($_GET['id']))
- When the page opens this code looks to see if the url has a value set for del and id.
$query = "DELETE FROM students WHERE id = ".$_GET['id'];
mysql_query($query)or die("Invalid query here: " . mysql_error());
- If del and id have values set in them the computer will execute this code. It directs MySQL to delete a record from the students table if it has an id that matches the number stored in the variable id.
function confirmDelete(href)
- This is the beginning of the javascript function. It is set to accept information from the line of code that calls it and place that information in the variable href. (info sent is: db_edit_or_delete.php?del=1&id=' . $row['id'] )
if (confirm("You are about to permanently delete this student record. Press OK to delete the record or Cancel to stop the deletion."))
- This javascript code causes a confirm box to appear with the text written between the double quotes, an OK button and a Cancel button.
window.location = href;
- If the user presses the Cancel button then this line of code will NOT be executed.
- If the user presses the OK button then this line of code will be executed and the browser will go to the url held in the href variable. In this case the url is directed at the page the browser is already displaying. The page is reloaded with the del and id variables set. This causes the execution of the delete query code described previously.
- Test your code to make it works correctly. Press the Del link for Tom Thumb and then press the Cancel button. Confirm that the record is not deleted.
- Press the Del link for Tom Thumb and then press the OK button. Confirm that the record for Tom Thumb was deleted.
MySQL Tutorial - Editing Records with a Form
In this exercise a PHP page will be created that receives an id value that was posted from db_edit_or_delete.php when a user clicked an edit link for a record in the students table.
- In Dreamweaver create a new PHP file named db_edit_record.php. Delete all of the existing code and replace it with:
<?php

	ini_set('display_errors', 1);

	$con = mysql_connect("localhost","web2_user","web2_pass");

	if (!$con){die('Could not connect: ' . mysql_error());}

	mysql_select_db("ENTER YOUR DATA BASE NAME HERE", $con);


	// this code will be executed when arriving at this page after a user clicked an

	// edit link on db_edit_or_delete.php

	if(isset($_GET['id']))

	{

	$id=$_GET['id'];

	$result = mysql_query("SELECT * FROM students WHERE id=$id");

	$student_id = mysql_result($result,0,"student_id");

	$last_name = mysql_result($result,0,"last_name");

	$first_name = mysql_result($result,0,"first_name");

	$graduation = mysql_result($result,0,"graduation");

	}


	// a record is being updated in the students table

	// this code will be executed when a user presses the Submit Changes button

	if (isset($_POST['submit']))

	{

	$id = $_POST['ud_id'];

	$new_student_id = $_POST['ud_student_id'];

	$new_last_name = $_POST['ud_last_name'];

	$new_first_name = $_POST['ud_first_name'];

	$new_graduation = $_POST['ud_grad_year'];


	$query="UPDATE students SET student_id='$new_student_id', last_name='$new_last_name', first_name='$new_first_name', graduation='$new_graduation' WHERE id='$id'";

	mysql_query($query);

	mysql_close($con);

	header("Location: db_edit_or_delete.php"); exit;

	}

	?>


	<!DOCTYPE html PUBLIC "-//W3C//DTD XHTML 1.0 Strict//EN" "http://www.w3.org/TR/xhtml1/DTD/xhtml1-strict.dtd">

	<html xmlns="http://www.w3.org/1999/xhtml">

	<head>

	<meta http-equiv="Content-Type" content="text/html; charset=utf-8" />

	<title>MySQL Tutorial - Edit a Record</title>

	</head>

	<body>

	<form action="" method="post" name="student_editor">

	<input name="ud_id" type="hidden" value="<?php echo $id; ?>" />

	<fieldset>

	<legend>Student Information</legend>

	<label>First name: <input name="ud_first_name" type="text" size="20" maxlength="18" value="<?php if(isset($first_name)) echo $first_name; ?>" /></label><br /><br />

	<label>Last name: <input name="ud_last_name" type="text" size="30" maxlength="28" value="<?php if(isset($last_name)) echo $last_name; ?>" /></label><br /><br />

	<label>Student ID: <input name="ud_student_id" type="text" size="7" maxlength="6" value="<?php if(isset($student_id)) echo $student_id; ?>" /></label><br /><br />

	<label>Graduation Year: <input name="ud_grad_year" type="text" size="5" maxlength="4" value="<?php if(isset($graduation)) echo $graduation; ?>" /></label><br /><br />

	</fieldset>

	<input name="submit" type="submit" value="Submit Changes" />

	</form>

	</body>

	</html>
- Save the changes to db_edit_record.php. FTP db_edit_record.php to the web server. We will not preview this file directly. Instead, go to db_edit_or_delete.php and press the edit link for Bart Starr to preview db_edit_record.php. Confirm that the fields are filled with data from the Bart Starr record.
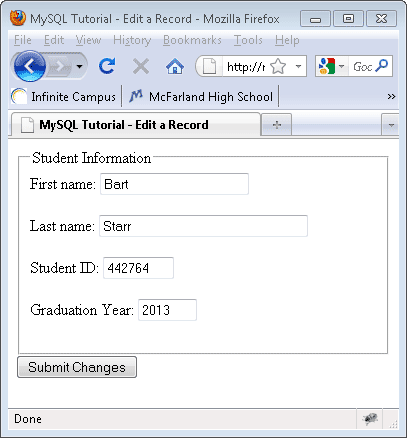
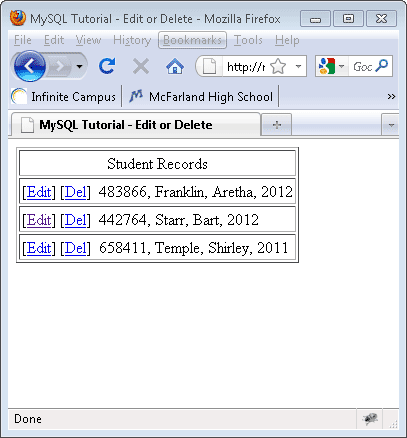
- Change the value in the graduation year from 2013 to 2012. Press the Submit Changes button. The changes are sent to the students table and then the browser is directed to return to db_edit_or_delete.php. Confirm that the Graduation Year for Bart Starr was changed to 2012.
- Take some time to experiment with the editing of student records by making changes to other students' records.
- Let's look at the new code in more detail:
if(isset($_GET['id']))

		{

		$id=$_GET['id'];

		$result = mysql_query("SELECT * FROM students WHERE id=$id");

		$row = mysql_fetch_array($result);

		$student_id = $row['student_id'];

		$last_name = $row['last_name'];

		$first_name = $row['first_name'];

		$graduation = $row['graduation'];

		}
- This code checks to see if a value for id has been passed to this page. If so the block of code is executed and all of the data for the record specified by the id value is fetched and placed into separate variables to be used later in the web form.
if (isset($_POST['submit']))
- This code checks to see if the submit button in the form was presssed. If true, the block of code will be executed and each posted value will be placed into variables and then sent to UPDATE the record in the students table.
header("Location: db_edit_or_delete.php"); exit;
- This code directs the browser to go to the web page listed, db_edit_or_delete.php.
|
|
|


 Confirm that the record for Tom Thumb has been added to the table.


