|

General Overview and Installation of Joomla!:
This site will be created using Joomla!. Joomla! is a free content management system (CMS) platform for publishing content on the World Wide Web. Joomla! is a tool that allows someone without extensive knowledge about web site building to create a very sophisticated web site. CMS means that the content of the site can be managed (changed) by someone who has been given an admin user name and password for access to the administration area of the site. This project will guide you through the process of building a web site using Joomla!.
Note: Joomla is the English spelling of the Swahili word jumla meaning "all together” or "as a whole.”
Steps:
- IMPORTANT: Preview the Joomla! student samples page so that you can gain a better understanding of what this project is about.
- Go to the Lessons menu in this site and choose Joomla! >Installation Steps. Follow the instructions to install Joomla!.
-
After installation is complete, choose a topic that would have a lot of easily found information on the Internet. For example, you could choose to create a site about pets, airplanes, automobiles, or birds. Do not choose a narrow or obscure topic such as 'Minor Feathers found on an Elderly English Sparrow's Right Cheek'.
- Create three Sections for the site. (Show me how) For example, the three Sections in an aircraft site might be Fixed Wing, Rotary Wing and Lighter Than Air.

- Create six Categories for the site. (Show me how) There will be two Categories for each Section. For example, the Section Lighter Than Air might have the Categories Helium Balloons and Hot Air Balloons.
- Create four Articles for the site. Two of the articles will be for one of your Categories and two of the articles will be for another Category. For example, the Category for Propeller aircraft might have Articles about the Cessna 152 and the Beechcraft Bonanza both of which are propeller driven aircraft. (Show me how)
- Create one article for the front page. (Show me how)
- Add menu items to the default main menu with links to Home and the Sections, Categories and Articles of the site. (Show me how)
- Create a Poll for the front page. (Show me how)
- Go to Extensions/Module Manager and create a Poll Module for the Poll. (Show me how)
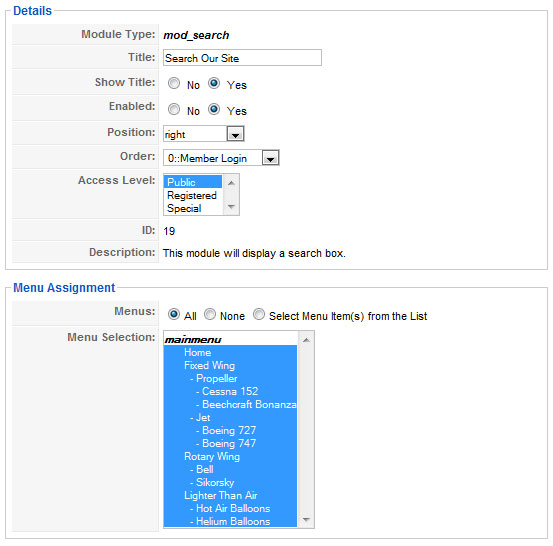
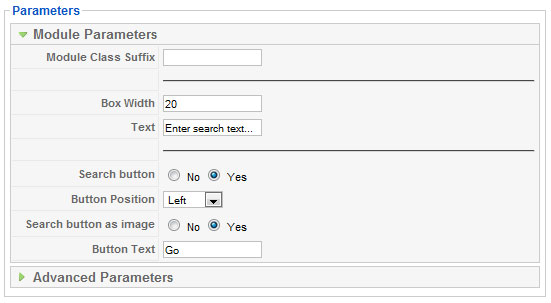
- Add a Search component. Go to the Module Manager and press the New button. Select the Search option. Click on the Next button. Use the values shown in the image below. NOTICE: Because the Menu Assignment is set to All the search component will appear on all of the pages in the web site.
- Go to the Extensions/Module Manager and create a Login Module for the front (home) page. (Show me how)
- Add three registered users. You will need to use real email accounts. For one of the three registered users you must make one of them for Mr. Lawless. Use jim_lawless@mcfarland.k12.wi.us for the email address, lawlesj for the username and password for the password. Create two registered accounts from other students in your class. You can get their information from them during class.
There are two ways to create new users.
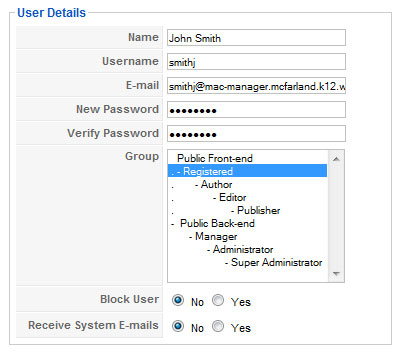
- While logged in as an administrator you can go to the Site menu and select User Manager. In this area you can press the New button and add users. You can give them a wide range of privileges. Most users that you create in the admin area will be special users that you wish to grant a higher level of access than the general registered users (members) of the site. For the purposes of this assignment you should assign the user to the Registered group.
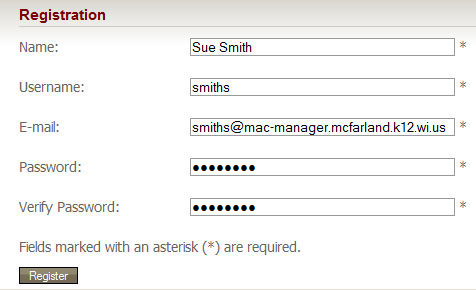
- Visitors to the site can press the Create Account link in the login module on the Home page and fill out the web form to become a member. They will be granted only the privileges that you have set for registered users. Before they can login to the site, you (the administrator) will need to enter the User Manager area and enable their accounts.
- In order to activate the new user accounts you will need to follow these steps.
- From the Site menu choose User Manager
- In the Enabled column click on the red circle with an x. The green check that appears indicates that the user is now enabled.
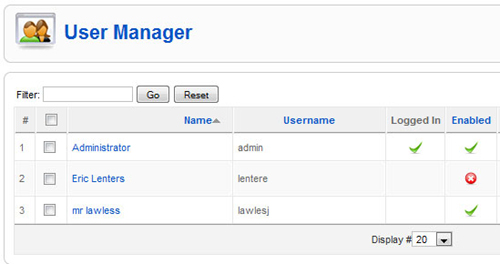
- Go back to your web site and log in as one of the new users to confirm that it works.
- What is the use of having registered members if there are not areas of the web site that is not accessible to the general public? Follow these steps to change two of the articles in the site so that they are accessible only to registered members.
- From the Content menu choose Article Manager
- Click on the name of the article that will be made visible to registered users only
- In the Parameters (Article) panel change the Access Level to registered.
- Press the Save button.
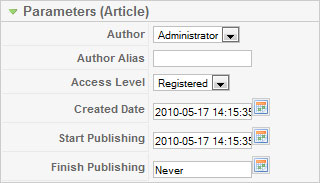
- You may have noticed when viewing the sample site provided for this project that many of the images were floated to the right so that they appeared to the right of the text. Floating images to the right or left is quite easily accomplished in Joomla. However, by default there is no margin around an image which results in the text being able to touch the edges of the image. Follow the steps below to add styles to the floated images.
- Open an article created for the site.
- Drag the image so that it is placed in front of the first letter of the paragraph in which it will be floated.
- Select the image to be floated and press the image button in the text editor.
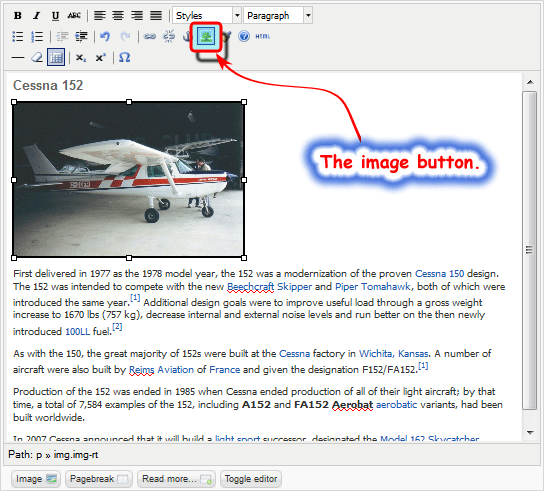
- In the dialog window that appears change the alignment to Right.
Press the Update button.
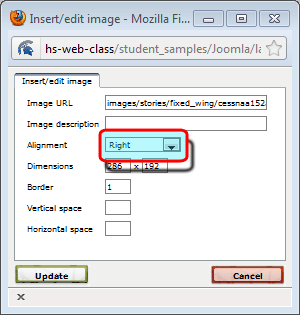
- Notice that the image has been floated to the right and that the text is touching the left edge of the image.
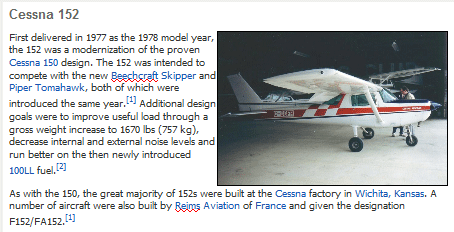
- Now you will need to add margin-right and margin-bottom styles to the image to prevent the text from touching the image. The first step will be to add a class to the image. The second step will be to modify the site's style sheet so that it recognizes the new class styles added to the image.
- Press the html button found in the toolbar.

- Find the image tag <img> and insert class="img-rt" as shown in the image below.
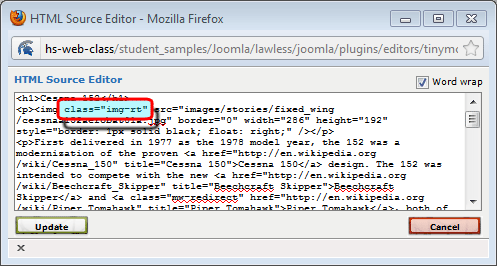
- Press the Update button.
- Press the Save button to save the changes made to the article.
- The next step is to modify the style sheet. In the Extensions select Template Manager.
- Click on the name of the default template (the template you are using for your site will have a gold star indicating it is the default template).
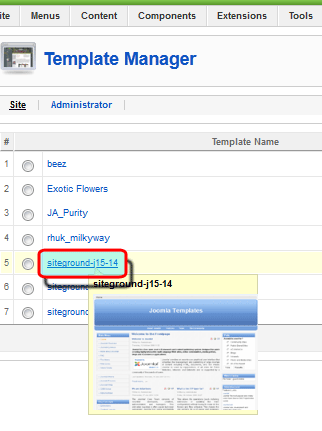
- Press the Edit CSS button.

Select the template.css option and then press the Edit button.

- Add the style .img-rt{margin-left:10px; margin-bottom: 6px;} to the style sheet.
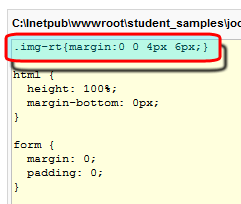
- Press the Save button.
- Check your web site to make sure that the image now uses the new margin styles.
- The default banner area of the template used for the sample Joomla! site appears like:

yet the sample site has a banner that appears like:

Accomplishing this transformation of the banner area requires a little knowledge of Photoshop, web design, Firebug and how to change the html found in the Joomla! template. Someone without web design knowledge would not be able to manipulate the Joomla! template in this manner. But you have learned the skills necessary to tinker with the template.
- The first step to take is to use Firebug to analyze the structure of that part of the web page that holds the banner image, often in the header box in Joomla! templates. Determine the name of the image, where it is located and where in the HTML code the image is coded.
- The second step is to use Photoshop to either create a new image or to edit the existing image.
- The third step is to modify the html of the template. Follow these steps to edit the html code:
- From the Extensions Manager menu select Template Manager.
- Click on the name of the default template.
- Click on the Edit HTML button.
- Edit the HTML as needed to accomplish your goal.
- Press the Save button when finished.
- Preview the results to make sure that the editing achieved the desired results.
- When you are finished with this site it will not need to be FTP'd to the web server. The site already exists on the server. You should view your site at: hs-web-class/web_students/your lastName_firstName/joomla.
- Place a note on the teacher's desk indicating that the site is ready to be graded.
|