HTML/XHTML Basics - Introduction
What is HTML?
- HTML stands for Hyper Text Markup Language
- An HTML file is a text file containing small markup tags
- The markup tags tell the Web browser how to display the page
- An HTML file must have an htm or html file extension
What Is XHTML?
- XHTML stands for EXtensible HyperText Markup Language
- XHTML is aimed to replace HTML
- XHTML is almost identical to HTML 4.01
- XHTML is a stricter and cleaner version of HTML
You will be using XHTML for the web sites that you build in this course.
XHTML - Markup Tags
Goals: Learn about markup tag pairs and self-closing tags
Tags Introduced:
<p> </p>, <div> </div>, <table> </table>, <strong> </strong>, <br />
What are markup tags?
According to Wikipedia: (http://en.wikipedia.org/wiki/Markup_language)
"The term markup is derived from the traditional publishing practice of "marking up"' a manuscript, which involves adding symbolic printer's instructions in the margins of a paper manuscript. For centuries, this task was done primarily by skilled typographers known as "markup men" who marked up text to indicate what typeface, style, and size should be applied to each part, and then passed the manuscript to others for typesetting by hand. Markup was also commonly applied by editors, proofreaders, and graphic designers."
Example tags:
<p> is the opening tag for a paragraph
</p> is the closing tag for a paragraph
<div> is the opening tag for a division
</div> is the closing tag for a division
<table> is the opening tag for a table
</table> is the closing tag for a table
<strong> is the opening tag for bold text
</strong> is the closing tag for bold text
Nearly all tags come in opening and closing pairs. Today XHTML is replacing the old HTML. They are very similar. One difference is that in the old HTML you could have a line break tag, <br> , that caused the browser to drop down to the next line. There is not a closing tag for the <br> tag in HTML. XHTML will not allow tags that are not closed so the <br> tag has been replaced with <br /> , referred to as a self closing tag. Be careful to notice that there is a space between the br and the /.
XHTML - Web Page Structure
Goals:
- Learn about basic web page structure
- Learn what docType is and why it is important
- Learn how to enter a web page title
New Terms: doctype, <body>, </body>
In its simplest form a web page will always have the following tags:
<html> the opening tag for a web page
<head> the opening tag for the head section
<title> </title> the opening and closing tags for the page title
</head> the closing tag for the head section
<body> the opening tag for the body section
</body> the closing tag for the body section
</html> the closing tag for the web page
The head section is used for technical matters such as the title of the page that appears in the upper left corner of the browser window and in the tabs of the newer browsers.
The body section is where all of the page content is placed. This is where you will do nearly all of your work.
Let’s build a web page using some html tags.
- Open Dreamweaver. (Note: We will not need to start a new site for this demo.)
- In Dreamweaver from the File menu select New. In the New Document window select HTML for the Page Type. In the Doc Type area select XHTML 1.0 Strict. Press the Create button. Somewhere in your Web Design folder on the I: drive save the file naming it first.html.
- In your first.html file press the Code button to view the html tags.
- The first thing you might notice is that there is code on the page that comes before the <html> tag. It appears as:
<!DOCTYPE html PUBLIC "-//W3C//DTD XHTML 1.0 Strict//EN" " http://www.w3.org/TR/xhtml1/DTD/xhtml1-strict.dtd">
The usual <html> tag appears as:
<html xmlns="http://www.w3.org/1999/xhtml">
The above code tells the browser that the web page was written using XHTML 1.0 language, not the older HTML 4.01 language. The word Strict means that our web page will be interpreted by the browser using strict rules as given by the World Wide Web Consortium (W3C) rules for XHTML. Using this particular mode will let you build web pages that meet modern standards for web design.
- Change the title of the page to My First Page. The code will appear as:
<title>My First Page</title>
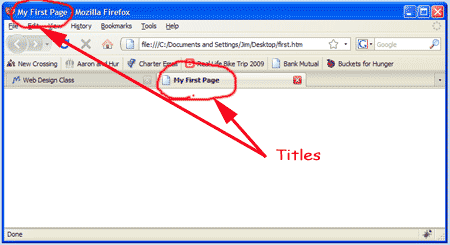 Preview the changes in a browser. Notice that the browser displays the page title in its upper left corner and, if more than one link is open, in the tab for the page. Preview the changes in a browser. Notice that the browser displays the page title in its upper left corner and, if more than one link is open, in the tab for the page.
XHTML - Text Tags
Goals: Learn how to use tags that are designed to display text on a web page.
New Terms:
<p>,</p>,<br />,<h1>,</h1><h2>,</h2><h3>,</h3>,<h4>,</h4><h5>,</h5>,<h6>,</h6> <strong>, </strong>
Text tags are those tags that are used to display text. Follow the steps listed below to try some of the text tags.
- The paragraph tag. In first.html between the opening, <body> , and closing, </body> , body tags enter the following:
<p>This is a paragraph. It is a fairly short paragraph.</p>
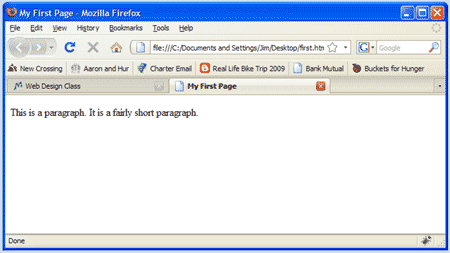 Preview the changes in a browser. Notice that the paragraph tag is used to display text on a web page. Preview the changes in a browser. Notice that the paragraph tag is used to display text on a web page.
- The break tag. In first.html, enter the following immediately after the code entered above:
<p>This is a paragraph<br />with a self-closing break tag inserted in it.</p>
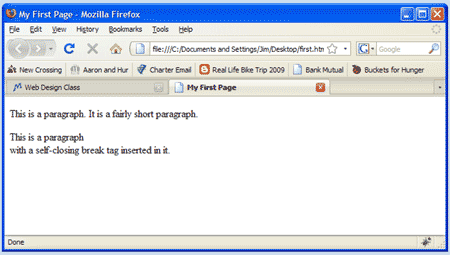 Preview the changes in a browser. Notice how the sentence has a line break, <br /> , that causes it to drop down one line on the page. Preview the changes in a browser. Notice how the sentence has a line break, <br /> , that causes it to drop down one line on the page.
- Heading tags. In first.html enter the following:
<h1>This is text in a heading 1 tag.</h1>

	<h2>This is text in a heading 2 tag </h2>

	<h3>This is text in a heading 3 tag.</h3>

	<h4>This is text in a heading 4 tag.</h4>

	<h5>This is text in a heading 5 tag.</h5>

	<h6>This is text in a heading 6 tag.</h6>
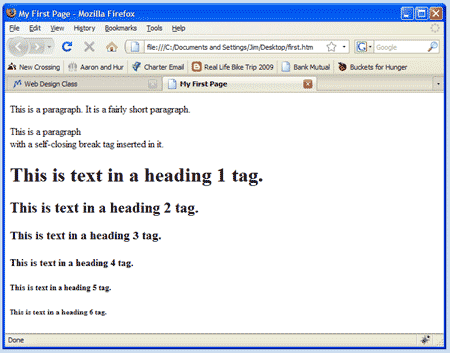 Preview the changes in a browser. Notice not only the sizing but the bold style that has been applied to the text. Preview the changes in a browser. Notice not only the sizing but the bold style that has been applied to the text.
- Strong (bold) tag. In first.html enter the following:
<p><strong>This is bold text.</strong>This is regular text.</p>
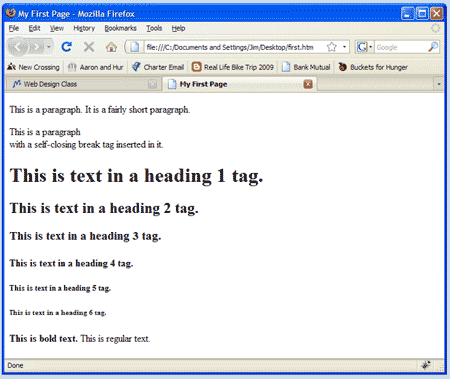 Preview the changes in a browser. Notice that the text inside the strong tags is bold and the text that is not inside the strong tags . Preview the changes in a browser. Notice that the text inside the strong tags is bold and the text that is not inside the strong tags .
- Emphasis (italics) tag. In first.html enter the following:
<p><em>This text is in italics.</em>This is regular text.</p>
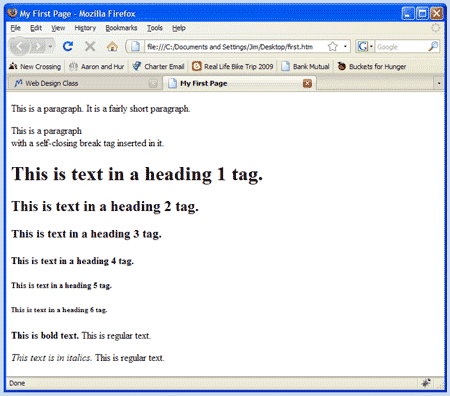 Preview the changes in a browser. Notice that the text within the emphasis tags is in italics and that the text not inside the emphasis tags is not in italics. Preview the changes in a browser. Notice that the text within the emphasis tags is in italics and that the text not inside the emphasis tags is not in italics.
XHTML - Horizontal Rule
Goals: Learn how to use the horizontal rule tag.
New Terms: <hr />
There is a tag, the horizontal rule tag, that is used to draw a horizontal line across a web page. Typically this tag is used to separate sections of a web page.
- On first.html press the Enter key to create a blank line between the
<h2>This is text in a heading 2 tag.</h2> line of code and the <h3>This is text in a heading 3 tag.</h3> line of code.
- Enter the following self-closing horizontal rule tag, <hr /> , in the blank line so the code now appears as:
<h2>This is text in a heading 2 tag.</h2>

	<hr />

	<h3>This is text in a heading 3 tag.</h3>
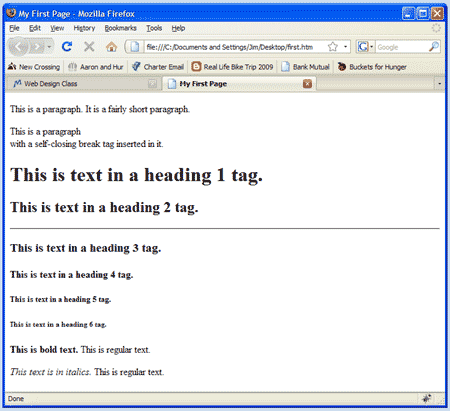 Preview the changes in a browser. Notice the horizontal rule that was created. Also notice in the code that the horizontal rule tag is self-closing; it does not have an opening and a closing tag. Preview the changes in a browser. Notice the horizontal rule that was created. Also notice in the code that the horizontal rule tag is self-closing; it does not have an opening and a closing tag.
XHTML - Anchor Tag (Links)
Goals: Learn how to use the anchor tag to create links.
New Terms: <a>, href, mailto
Anchor tags are used to create links. Links are either external, internal or email.
External links are links to pages outside of your site. For example you may want to have a link to Google.
- In first.html remove all of the code between the <body> and </body> tags.
- In first.html in the body of the web page enter the following:
<a href="http://www.google.com">Google</a>
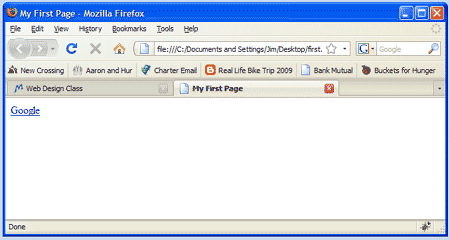 Preview the changes in a browser. Test the link to Google that appears. The anchor tag is used to create links. The href stands for hypertext reference. Preview the changes in a browser. Test the link to Google that appears. The anchor tag is used to create links. The href stands for hypertext reference.
Internal links are links to pages that are located within your site. For example you may want a link to your page named first.html.
- In first.html in the body of the web page enter the following:
<a href="first.html">My First Page</a>
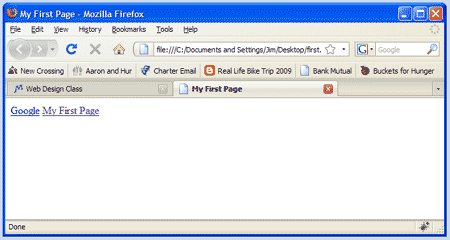 Preview the changes in a browser. In this case the link is to the page we are previewing so the page just reloads. Preview the changes in a browser. In this case the link is to the page we are previewing so the page just reloads.
Email links are links to email addresses rather that a web page. Often a web site has a link named ‘Contact Us’ that is an email link.
- In first.html in the body of the web page enter the following:
<a href="mailto:rover@weluvdogs.net">Contact Us</a>
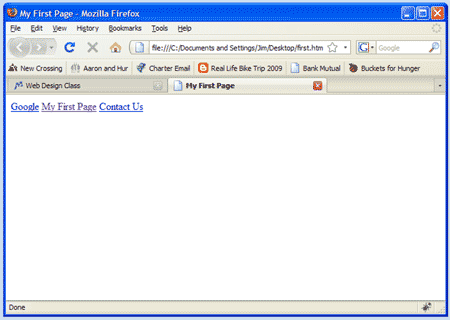 Preview the changes in a browser. The browser attempts to open what ever email program has been set in its preferences. Preview the changes in a browser. The browser attempts to open what ever email program has been set in its preferences.
- Finally it is worth mentioning at this point that you may have noticed the links are not stacking vertically on the web page but instead are laying horizontally across the web page. This is due to the fact that some web page elements are by default inline elements and other are block. Inline elements, such as anchors (<a>) are displayed horizontally. Block elements such as paragraphs (<p>) and headers (<h1>,<h2> ,etc...) are displayed vertically.
XHTML - Table Tag
A table on a web page is very similar to a table that you would create in a Microsoft Word® document. There are rows and columns made up of cells. You can place any type of web content in a table cell. Tables were once used for page layout but the CSS box model has replaced that now. Tables should only be used to display rows of items that need to be shown in columns.
- In first.html remove any code in the body of the web page.
- In first.html in the body of the web page enter the following:
<table border="1">

	<tr>

	  <td>Row 1, Cell 1</td>

	  <td>Row 1, Cell 2</td>

	</tr>

	<tr>

	  <td>Row 2, Cell 1</td>

	  <td>Row 2, Cell 2</td>

	</tr>

	</table>
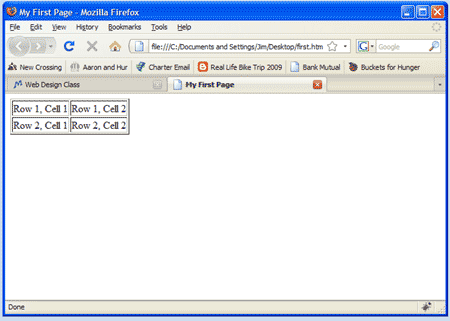 Preview the changes in a browser. Preview the changes in a browser.
The opening table tag, <table> , is used to open a table and the closing table tag, </table> , closes the table.
Notice that inside the opening table tag there has been added an attribute of border=”1” .
We will not use attributes in this class because we will be using CSS (cascading style sheets) to give the web page elements their styles.
The opening table row tag, <tr> opens a table row and the closing table row tag, </tr> , closes a table row. The opening table data tag, <td> , opens a table data area often referred to as a cell, and the closing table data tag, </td> , closes the table data area. The number of cells in each row of a table must be identical for the table to display correctly unless you use the colspan attribute to merge cells.
- In first.html in the body of the web page and below the first table enter the following:
<!-- This is called a comment. I use it to make comments that the computer should ignore -->
<p> <p> <!-- is a code for non-breaking space -->
<table border="1">
<tr>
<td colspan="2">Row 1 with merged cells.</td>
</tr>
<tr>
<td>Row 2, Cell 1</td>
<td>Row 2, Cell 2</td>
</tr>
</table>
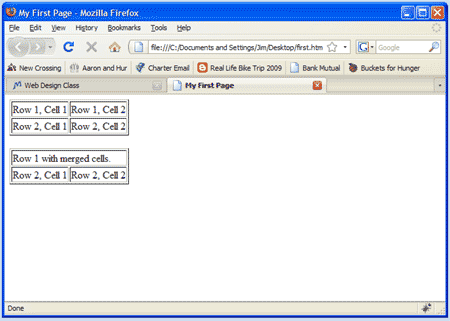 Preview the changes in a browser. Preview the changes in a browser.
Notice how the cells of row 1 were merged into a single cell spanning the width of two columns.
- Next, we will build a table to display information about some birds that were spotted recently. Building tables is a real art. It used to be something that we spent a lot of time on in this course. However, since we now use CSS to provide the layout of the web pages rather than cleverly crafted tables, we do not need to spend so much time designing tables. Dreamweaver provides a simple (web design for nubs) method of building tables that we will take advantage of for this exercise.
-
- In Dreamweaver press the Design view button
- From the Insert menu choose Table.
- Enter 5 for Rows and 3 for Columns. Remove the Table width so it is empty. Press OK.
- Drag the mouse across the three cells of the top row. R-click on the selected cells and choose Table, Merge Cells.
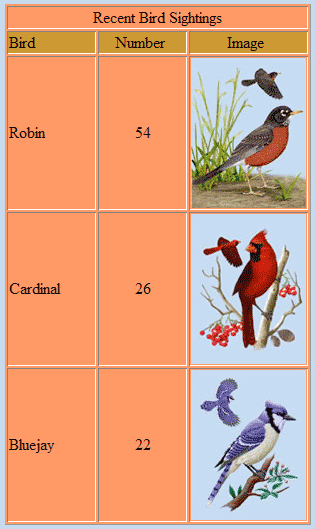
- Enter the text 'Recent Bird Sightings' in the merged row 1 cells.
- In row 2 enter the text 'Bird' in cell 1, 'Number' in cell 2 and 'Image' in cell 3.
- In row 3 enter the text 'Robin' in cell 1, the number 54 in cell 2.
- To add a picture of a Robin in cell 3 you will need to navigate to the folder that has the robin image and then drag and drop it into cell 3. The right-side of the Dreamweaver window has a navigation area that you can use to find the image. The image is located on the J: drive in Lawless/Hand-Out/Web Design/CSS Tutorial Items/ . Drag the robin.jpg image into cell 3.
- In row 4 enter the text 'Cardinal' in cell 1, the number 26 in cell 2 and then drag the cardinal.jpg image into cell 3.
- In row 5 enter the text 'Bluejay' in cell 1, the number 22 in cell 2 and then drag the bluejay.jpg image into cell 3.
- Place the cursor in row 1. In the Properties window select the Align Center icon to center the text.
- Referring to the image below these instructions, center the text in each cell as shown.
- Click on the outside border of the table to select the table. In the Properties window select a background (bg) color for the entire table.
- Place the cursor in row 1. In the Properties window select a background (bg) color for that row.
- Drag the mouse across the three cells of row three. In the Properties window select a background color (bg) color for the three selected cells.
- Finally, click on the outside border of the table to select the table. Grab a handle an pull the table to make it wider. Notice that if you place the cursor on a cell border you can pull the border to make the column wider or narrower, or to make a row taller or shorter.
XHTML - List Tags
List tags are used when creating lists of items on a web page. There are two types of lists: unordered and ordered. Unordered lists have bullets in front of each list item. Ordered lists have numbers or letters in front of each list item.
- In first.html remove any code in the body of the web page.
- Unordered list. In first.html in the body of the web page enter the following:
<ul>

	  <li>Coke</li>

	  <li>Pepsi</li>

	  <li>Dr. Pepper</li>

	</ul>
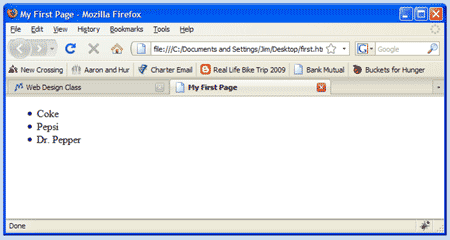 Preview the changes in a browser. Preview the changes in a browser.
The <ul> tag is for creating an unordered list of items.
The <li> tag is for displaying a list item.
- Ordered list. In first.html in the body of the web page enter the following:
<ol>

	  <li>Coke</li>

	  <li>Pepsi</li>

	  <li>Dr. Pepper</li>

	</ol>
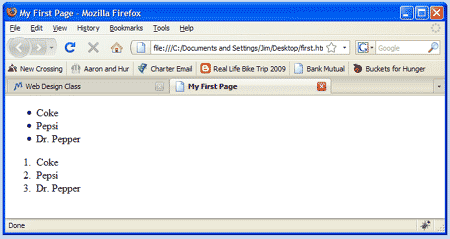 Preview the changes in a browser. Preview the changes in a browser.
The <ol> tag is for creating an ordered list of items.
The <li> tag is for displaying a list item.
- Attributes. Try adding an attribute to the latest list. Add the following inside the <ol> tag: type=”I” so that it appears as:
<ol type="I">
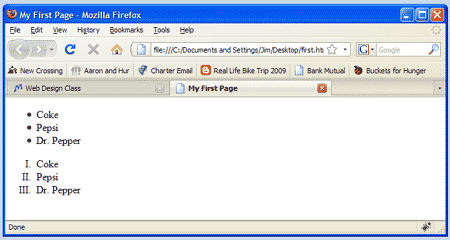 Preview the changes in a browser. Preview the changes in a browser.
You can also use "i", "A", and "a" attributes in ordered lists.
Unordered lists have the attribute types of disc, circle and square.
Note: the use of types in list elements has been deprecated and should be handled through CSS styles. You will be learning about CSS later on in this course.
- You can even place lists inside other lists. In first.html in the body of the web page enter the following: (coloring and indentation added to make the nesting of the two unordered lists easier to visualize)
<ul>

	   <li>Milk</li>

	   <li>Juice

	     <ul> <!-- start of another unordered list inside of an unordered list item -->

	       <li>Orange Juice</li>

	        <li>Grape Juice</li>

	     </ul>

	   </li>

	   <li>Water</li>

	</ul>
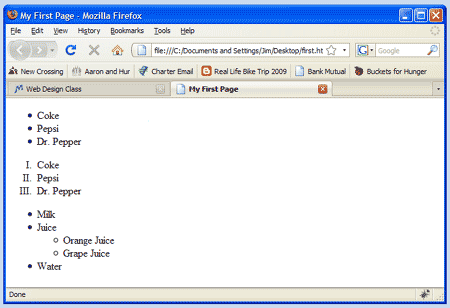 Preview the changes in a browser. Preview the changes in a browser.
Notice the indentation and change of attribute type for the nested list.
XHTML - Image Tag
Images are placed on a web page using the self-closing <img /> tag. There are two attributes that we will use in the tag to tell the browser the location of the image and some alternate text to use if the picture does not load. The alt text is also important because it can be "spoken" by the computer when a visually impaired user is visiting the page.
- In first.html remove the code in the body of the web page.
- Before continuing with this tutorial you will need to have a copy of the cat pictured above. Right-click on the cat image and save a copy in the same folder on your I: drive that has your first.html file.
- Enter the following code in the body of first.html.
<img src="fat_cat.jpg" alt="a picture of a very fat cat" />
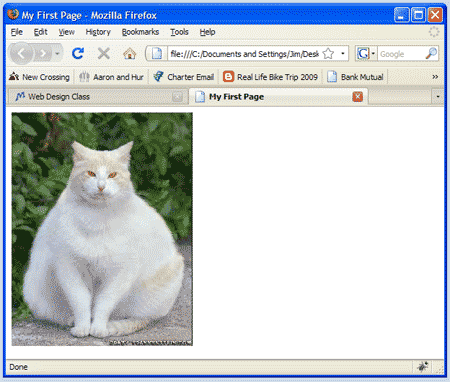 Preview the changes in a browser. Preview the changes in a browser.
Notice that the browser will not display the picture unless it can find a file named fat_cat.jpg in the same folder as first.html.
The src stands for 'source' and alt stands for 'alternate text'.
|
|
|
 Preview the changes in a browser. Notice that the browser displays the page title in its upper left corner and, if more than one link is open, in the tab for the page.
  Preview the changes in a browser. Notice that the paragraph tag is used to display text on a web page.
  Preview the changes in a browser. Notice how the sentence has a line break, <br /> , that causes it to drop down one line on the page.
  Preview the changes in a browser. Notice not only the sizing but the bold style that has been applied to the text.
  Preview the changes in a browser. Notice that the text inside the strong tags is bold and the text that is not inside the strong tags .
 Preview the changes in a browser. Notice the horizontal rule that was created. Also notice in the code that the horizontal rule tag is self-closing; it does not have an opening and a closing tag.
 Preview the changes in a browser. Test the link to Google that appears. The anchor tag is used to create links. The href stands for hypertext reference.
  Preview the changes in a browser. In this case the link is to the page we are previewing so the page just reloads.
 Preview the changes in a browser. The browser attempts to open what ever email program has been set in its preferences.
 Preview the changes in a browser.
 Preview the changes in a browser.
 Preview the changes in a browser.
 Preview the changes in a browser.
 Preview the changes in a browser.
 Preview the changes in a browser.

 Preview the changes in a browser.