|
Life Simulation Project
The Life simulation was devised by a mathematician as a model of a very simple world. The Life world is a 10-by-10 grid of cells made of buttons. Each cell may be empty or contain a single creature. Each day, creatures are born or die in each cell according to the number of neighboring creatures on the previous day. A neighbor is a cell that adjoins the cell either horizontally, vertically, or diagonally. The rules are:
If the cell currently has a living creature then
If the number of neighbors is 2 or 3
the creature remains alive
Else
the creature dies (of either loneliness or overcrowding)
Else If the cell does not currently have a living creature then
If the number of neighbors is 3
the cell receives a creature
Else
it remains empty
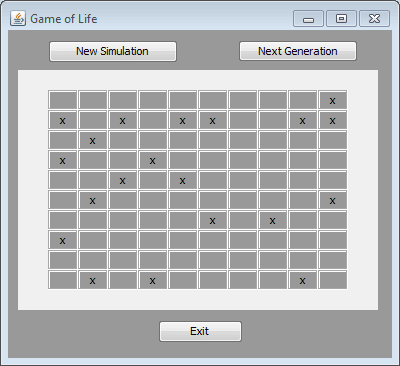
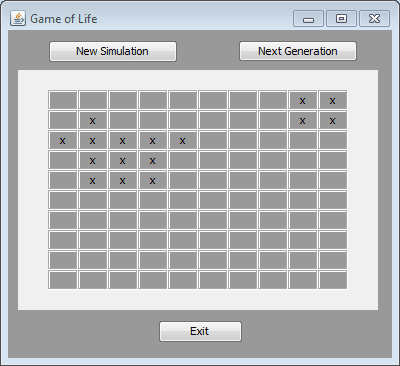
The images below show how following these rules would affect the arrangement of creatures from one generation to the next.
 |
|
 |
| Life Simulation - The First Generation |
|
Life Simulation - The Second Generation |
Project Building Steps:
CAUTION: Do not add the look-and-feel code to this project. It is not possible to completely hide buttons when that code is added.
- Unzip and launch the GUI_Life file to see a finished version of this project.
- Create a new project in NetBeans named Life Simulation.
- Add a JFrame Form (File, New File, Swing GUI Forms, JFrame Form)
- Set the Layout of the JFrame to Null
- Change the Form Size Policy of the JFrame to Generate Resize Code
- Change the Form Size to 500-by-400
- Change the title of the JFrame form to Life Simulation 1.0
- Add a JPanel to the JFrame
- Set the Layout of the JPanel to Null
- Stretch the JPanel so that it covers the entire JFrame
- Change the background color of the jPanel to white [255,255,255]
- Add a second jPanel inside the first jPanel
- Set the layout of the second jPanel to Null
- Change the size of the second JPanel to 373-by-229 by entering the width and height in the Properties Pane. (the grid of buttons will completely fill this JPanel)
- Change the background color of the JPanel to red [255,0,0]
- In this step you will create a 12-by-12 grid of buttons (Yes, there only needs to be a 10-by-10 grid of buttons but you will see the logic in having a 12-by-12 grid when you begin coding).
- Drag a Button onto the second JPanel. Select the button. In the Properties Pane:
- DO NOT take the time to change the variable name. It would not be useful for this program.
- change the text to a small case x
- change the border to Line Border (so the button will have a 1px, solid border)
- deselect the contentAreaFilled check box (so the button will be transparent)
- deselect the focusPainted check box (so the button doesn't change color when clicked)
- deselect the focusable check box
- deselect the rolloverEnabled check box (so the button doesn't change color when the mouse rolls over it)
- change the X position to 0 (to move the button to the left side of the JPanel)
- change the Y position to 0 (to move the button to the top of the JPanel)
- set the width to 32
- set the height to 20
- Right-click on the button. Choose Copy.
- Press Ctrl-V on the keyboard to paste a copy of the button
- change the X property to 31 (move the button 31 pixels to the right so there is a 1px overlap)
- Paste a total of 10 more buttons moving each button 31 pixels to the right by changing its X property.
- Press the Run button to view the project.
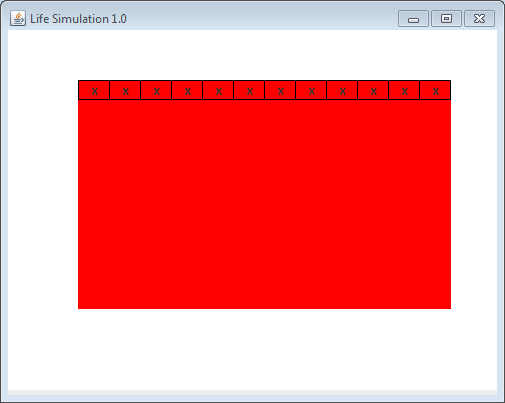
- Before proceeding click on each button and look at its name in the Inspector. The buttons MUST be in order from jButton1 through jButton12.
- Because we will not want the project to start with the letter x in the boxes it would be good to remove them now. Select the 12 boxes and set the text to empty.
- Now it is time to fill in the rest of the grid with buttons. Select all 12 jButtons (shift-clicking in the Inspector is easiest). Right-click in the selected buttons and choose Copy. Right-click in an empty part of the panel and choose Paste to paste a copy of the 12 buttons
- While the new row of buttons is still selected set the Y Property to 19. This will move them down leaving a 1px overlap with the row above.
- If you copy the second row of buttons and paste again you can simply add 19 to the Y Property to move the third row down to where it belongs. Repeat this process until you have twelve rows of buttons.
- Check the order of the buttons. They MUST be in order from jButton1 through JButton144 for this project to be completed successfully. Press the Run button to see how the project appears.
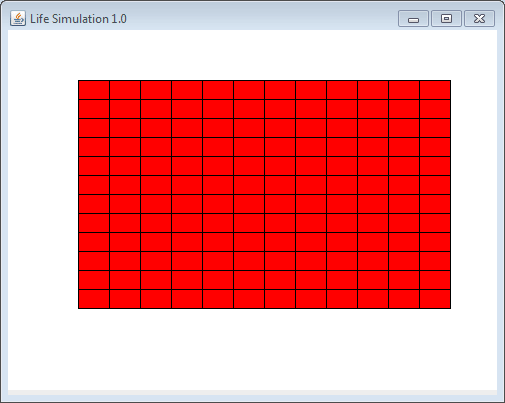
- Since the outer ring of buttons will not be used to display creatures we will want to remove the borders and change the background color to white.
- Use the Ctrl key and the mouse to select all of the buttons that make up the outer ring.
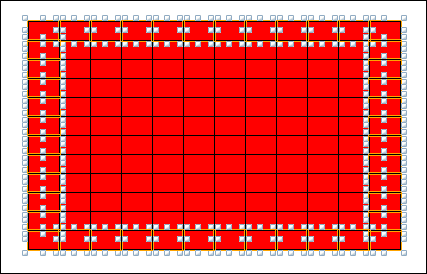
- Set borders to no border
- Set the background to white
- Set the contentAreaFilled to selected
- Set the enabled property to deselected
- Set the opaque property to selected
- Notice that some borders are not showing on buttons where you do want to see the borders. Select the buttons that make up the right side of the grid. Change the width to 31 and the X property to 342. This will make them slightly smaller and shift them to the right 1px.
- Select the buttons that make up the left side of the grid. Change the width to 31.
- Select the buttons that make up the top row. Change the height to 19.
- Select the buttons that make up the bottom row. Change the height to 19 and the Y property to 210.
- Press the Run button to preview the project. Make sure all of the borders appear correctly.
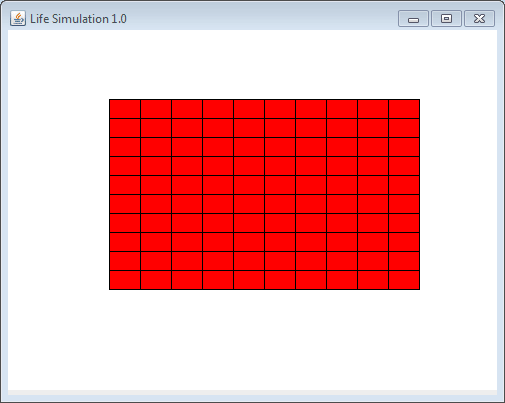
- In the Inspector select jPanel2. In the Properties pane change the X and Y property to position the grid of buttons so that it is centered from left to right in the JFrame.
- During the running of the Life Simulation you will often need to make changes to the grid of buttons. For example you make need to make the text property set to empty to clear the grid before starting a new simulation. Making changes to buttons individually would require an amazing number of lines of code. To avoid that sort of problem you will create an array (remember that from Programming 1?) that will hold one JButton in each index. Then, you can use a for...loop to make changes to the buttons with only a few lines of code.
Follow these steps to create a button array named cell[ ] and then place each button into the cell[ ] button array.
- At the very top of the source code paste this import code: import javax.swing.JButton;
- As a field variable declare the button array: JButton cell[] = new JButton[145];
Place it right after the existing line of code: public class Life extends javax.swing.JFrame {.
- In the constructor after the existing line initComponents(); assign buttons jButton1 through jButton144 into cell[1] through cell[144]. To save time and avoid errors the code is supplied for you.
Copy and paste the following code:
cell[1]=jButton1;cell[2]=jButton2;cell[3]=jButton3;cell[4]=jButton4;cell[5]=jButton5;

		cell[6]=jButton6;cell[7]=jButton7;cell[8]=jButton8;cell[9]=jButton9;cell[10]=jButton10;

		cell[11]=jButton11;cell[12]=jButton12;cell[13]=jButton13;cell[14]=jButton14;cell[15]=jButton15;

		cell[16]=jButton16;cell[17]=jButton17;cell[18]=jButton18;cell[19]=jButton19;cell[20]=jButton20;

		cell[21]=jButton21;cell[22]=jButton22;cell[23]=jButton23;cell[24]=jButton24;cell[25]=jButton25;

		cell[26]=jButton26;cell[27]=jButton27;cell[28]=jButton28;cell[29]=jButton29;cell[30]=jButton30;

		cell[31]=jButton31;cell[32]=jButton32;cell[33]=jButton33;cell[34]=jButton34;cell[35]=jButton35;

		cell[36]=jButton36;cell[37]=jButton37;cell[38]=jButton38;cell[39]=jButton39;cell[40]=jButton40;

		cell[41]=jButton41;cell[42]=jButton42;cell[43]=jButton43;cell[44]=jButton44;cell[45]=jButton45;

		cell[46]=jButton46;cell[47]=jButton47;cell[48]=jButton48;cell[49]=jButton49;cell[50]=jButton50;

		cell[51]=jButton51;cell[52]=jButton52;cell[53]=jButton53;cell[54]=jButton54;cell[55]=jButton55;

		cell[56]=jButton56;cell[57]=jButton57;cell[58]=jButton58;cell[59]=jButton59;cell[60]=jButton60;

		cell[61]=jButton61;cell[62]=jButton62;cell[63]=jButton63;cell[64]=jButton64;cell[65]=jButton65;

		cell[66]=jButton66;cell[67]=jButton67;cell[68]=jButton68;cell[69]=jButton69;cell[70]=jButton70;

		cell[71]=jButton71;cell[72]=jButton72;cell[73]=jButton73;cell[74]=jButton74;cell[75]=jButton75;

		cell[76]=jButton76;cell[77]=jButton77;cell[78]=jButton78;cell[79]=jButton79;cell[80]=jButton80;

		cell[81]=jButton81;cell[82]=jButton82;cell[83]=jButton83;cell[84]=jButton84;cell[85]=jButton85;

		cell[86]=jButton86;cell[87]=jButton87;cell[88]=jButton88;cell[89]=jButton89;cell[90]=jButton90;

		cell[91]=jButton91;cell[92]=jButton92;cell[93]=jButton93;cell[94]=jButton94;cell[95]=jButton95;

		cell[96]=jButton96;cell[97]=jButton97;cell[98]=jButton98;cell[99]=jButton99;cell[100]=jButton100;

		cell[101]=jButton101;cell[102]=jButton102;cell[103]=jButton103;cell[104]=jButton104;cell[105]=jButton105;

		cell[106]=jButton106;cell[107]=jButton107;cell[108]=jButton108;cell[109]=jButton109;cell[110]=jButton110;

		cell[111]=jButton111;cell[112]=jButton112;cell[113]=jButton113;cell[114]=jButton114;cell[115]=jButton115;

		cell[116]=jButton116;cell[117]=jButton117;cell[118]=jButton118;cell[119]=jButton119;cell[120]=jButton120;

		cell[121]=jButton121;cell[122]=jButton122;cell[123]=jButton123;cell[124]=jButton124;cell[125]=jButton125;

		cell[126]=jButton126;cell[127]=jButton127;cell[128]=jButton128;cell[129]=jButton129;cell[130]=jButton130;

		cell[131]=jButton131;cell[132]=jButton132;cell[133]=jButton133;cell[134]=jButton134;cell[135]=jButton135;

		cell[136]=jButton136;cell[137]=jButton137;cell[138]=jButton138;cell[139]=jButton139;cell[140]=jButton140;

		cell[141]=jButton141;cell[142]=jButton142;cell[143]=jButton143;cell[144]=jButton144;
- Add the New Simulation button.
To demonstrate how using a for loop to move through a button array can make changing the button properties easier add the following code to the New Simulation button:
for(int i=1; i<=144; i++)

	        {

	            cell[i].setText("x"); // set the text of the button in cell i to the letter x

	        }
Press the Run button to preview the project. Press the New Simulation button. Notice that the letter x appears in each of the buttons.
Delete the code in the New Simulation button.
- Code the New Simulation button as follows:
There will need to be 20 creatures at the beginning of the simulation. Each creature must be placed in a cell that is not already occupied by another creature. The goal here is to randomly generate 20 different numbers. The numbers will represent which button will receive an creature.
- Create an integer array to store the position that each of the 20 creatures will occupy. For example you could use:
int creature_layout[] = new int[21]; (I created 21 indexes because I don’t like to use the 0 index)
- Stop and think about the grid of buttons (imagine them as cells) that make up the simulation. The first cell that can be occupied is cell 14 because cells 1 through 13 are border cells that cannot contain a creature. The last cell that can be occupied is cell 131. Unfortunately because we have a border of invalid buttons that surrounds the grid we will need to find a way to avoid assigning them creatures. The invalid cells along the left side of the grid are numbered 25, 37, 49, 61, 73, 85, 97, 109 and 121. Notice that each of those numbers when divided by 12 have a remainder of 1. That means we can avoid them by excluding all cell numbers that when divided by 12 have a remainder of 1. The other invalid cells are along the right side of the grid. Their numbers are 24, 36, 48, 60, 72, 84, 96, 108 and 120. Notice that each of those numbers when divided by 12 have a remainder of 0. That means we can avoid them by excluding all cell numbers that when divided by 12 have a remainder of 0. Given those restrictions, generate a random number from 14 to 131 for each of the creatures and assign that number to each of the twenty spots available in the creature_layout array.
- In the Life simulation there may not be a cell that is occupied by more than one creature. That means that when generating the 20 random numbers there cannot be any repeats. Your code must be written so that after each random number is selected it checks to make sure it is not a repeat. If there is a duplicate in the numbers, chose another number until it is not a repeat of a previously selected number.
int num=0;

		// loop to determine the 20 creature locations

		for(int i=1; i<=20; i++)

		{

		// the do while loop forces the computer to select a cell that is allowed to have a creature

		do{

		num=(int)(Math.random()*118 + 14);

		}while(num%12==1 | num%12==0);


		// place the selected number in the creature_layout array


		// loop through the existing numbers stored in the creature_layout array

		// to see if the number selected matches any previously stored numbers

		// if there is a repeat then set the i loop back one using i--; so that a new

		// number can be selected

		}

		// after all 20 positions have been filled use a loop to set the text of the buttons at

		// those position to "x"
- After all twenty spots in the creature_layout array are assigned numbers use the numbers to place creatures on the grid of buttons. The following code demonstrates how you could use a loop to accomplish your goal:
for(int i=1; i<=20; i++)

		   cell[creature_layout[i]].setText("x");
- Add the Next Generation button.
- Code the Next Generation button.
- The button labels on the screen will not be changed to the next generation’s layout until after the entire button grid has been analyzed and the next generation layout has been calculated. You will need to create an integer array with index values 0-144 For example you could choose to use: int next_gen[] = new int[145]; to store the information about the next generation. Because the array is an int array you could decide that placing a 1 in the array represents a cell that will be alive in the next generation while a 0 will represent a cell that will be not living in the next generation. For example if cell[14] will be alive in the next generation then next_gen[14] should have a value of 1. If not, then the value stored in next_gen[14] would be 0.
- Use these rules to determine the layout of the next generation: (you will be able to use a for() loop to determine the condition of each of the cells and store either a 1 or a 0 in the array)
If the cell currently has a living creature then
If the number of neighbors is 2 or 3
the creature remains alive
Else
the creature dies (of either loneliness or overcrowding)
Else //if the cell is not currently living
If the number of neighbors is 3
the cell receives a creature
Else
it remains empty
- After the layout for the next generation has been calculated add the code below to set the text for the new generation.
for(int i=14; i<=131; i++)

		{

		 if(next_gen[i]==1)

		   cell[i].setText("x");

		 else

		   cell[i].setText("");

		}
-
- Add and then write the code for an Exit button.
|